GitHub Copilot Chat has taken a big leap forward by letting you connect your own custom AI model - for instance powered by Azure AI Foundry - to the chat interface. This guide will walk you through deploying the DeepSeek R1 model (or any Azure AI Foundry-supported OSS model) and using a local LiteLLM proxy (exposing an ollama-like API) to enable this integration in VSCode Insiders, currently supported in Copilot chat, but not yet for code suggestion.
1. Set Up Your Azure AI Foundry Model
- Create an Azure Account: If you don’t already have one, sign up at azure.microsoft.com.
- Access Azure AI Foundry: In the Azure Portal, search for “Azure AI Foundry” (or “Azure AI Studio”) and create or open a Foundry hub.
- Find the DeepSeek R1 model in the model catalog.
- Click Deploy and follow the prompts (name your deployment, select region, etc.).
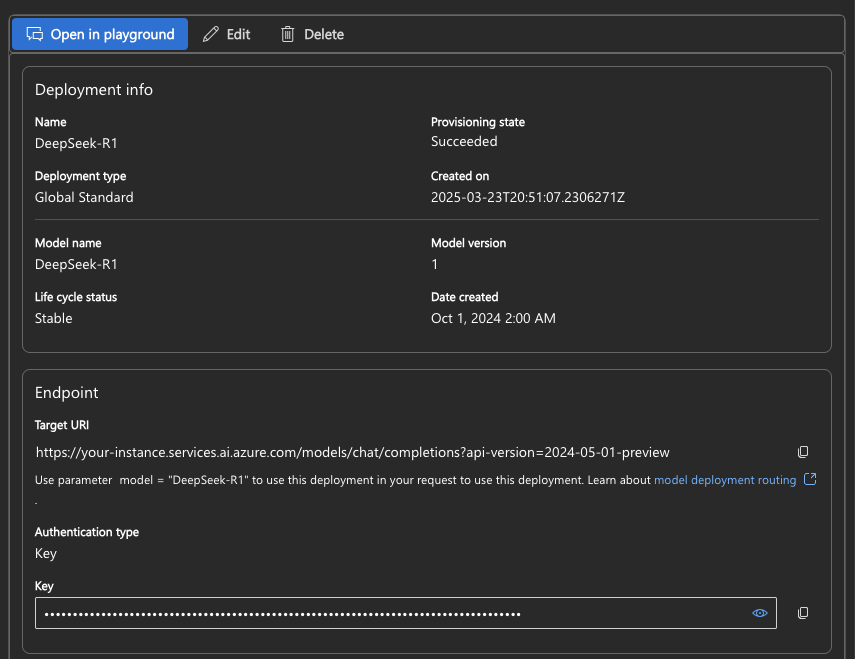
- Once deployed, note the following details from the deployment’s overview: Name, Target URI, Key, API Version
2. Install LiteLLM Locally on macOS
LiteLLM serves as a proxy that converts GitHub Copilot Chat’s requests into API calls for your Azure AI Foundry model. First, install LiteLLM by running:
$ pip3 install "litellm[proxy]"
Next, create a configuration file named litellm_config.yaml with the following content:
model_list:
- model_name: deepseek-r1
  litellm_params:
    model: azure_ai/deepseek-r1
    deployment: "deepseek-r1"
    api_base: "https://your-instance.services.ai.azure.com"
    api_key: "xyz"
    api_version: "2024-05-01-preview"
Finally, start LiteLLM on port 11434 (the port GitHub Copilot expects for an Ollama-compatible API) by executing:
$ litellm --config litellm_config.yaml --port 11434
3. Configure GitHub Copilot Chat in VS Code Insiders
Important: The current custom model support is available only in VS Code Insiders and works only in copilot chat.

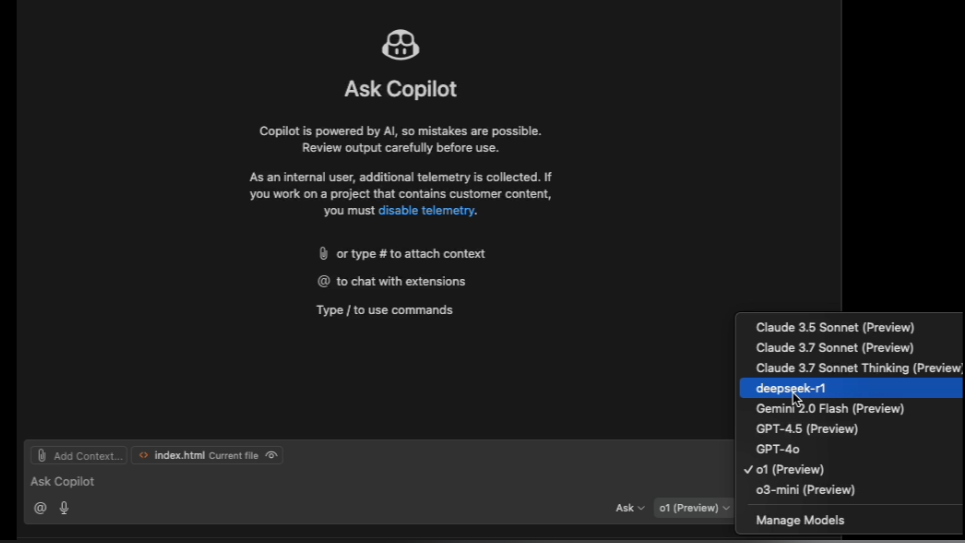
When you open the GitHub Copilot Chat sidebar, click on the model picker at the bottom of the panel. In the model picker, select “Manage Models”. You’ll then be prompted to choose your model provider - for example, you might see options like “Azure” or “Ollama” In our case, select Ollama since we’re using an ollama protocol via LiteLLM.
After choosing the provider, enter the required details such as the name of the model (e.g. deepseek-r1) and ensure you enable function calling. Once saved, your custom model will appear in the model picker, and you can select it to activate it for your Copilot Chat sessions.

This integration opens up exciting possibilities for using specialized models that may be better suited for specific domains or coding tasks, while still leveraging the familiar GitHub Copilot interface and workflow.
